Archive for 2013
C++ Program That Perform Number Operation(Malay)

#include <iostream>
using namespace std;
void pilihansaya();
double add(double, double);
double subtract(double, double);
double multiply(double, double);
double divide(double, double);
int main()
{
double x, y;
int pilihan;
do
{
pilihansaya();
cin >> pilihan;
switch (pilihan)
{
case 1:
cout << "Masukkan Dua Nombor: ";
cin >> x >> y;
cout << "Jumlahnya adalah:" << add(x,y) <<endl;
break;
case 2:
cout << "Masukkan Dua Nombor: ";
cin >> x >> y;
cout << "Perbezaannya adalah: " << subtract(x,y) <<endl;
break;
case 3:
cout << "Masukkan Dua Nombor: ";
cin >> x >> y;
cout << "Jumlahnya adalah: " << multiply(x,y) <<endl;
break;
case 4:
cout << "Masukkan Dua Nombor: ";
cin >> x >> y;
cout << "Pembahagiannya adalah: " << divide(x,y) <<endl;
break;
default:
cout << "Jangan Main Main" << endl;
}
}while (pilihan != 5);
return 0;
}
void pilihansaya()
{
cout << "++++++++++" << endl;
cout<<"Pilihan Menu:"<<endl;
cout << "1: Tambah " << endl;
cout << "2: Tolak" << endl;
cout << "3: Darab " << endl;
cout << "4: Bahagi " << endl;
cout << "++++++++++ " << endl;
cout << "Pilihan Anda :";
}
double add(double a, double b)
{
return a+b;
}
double subtract(double a, double b)
{
return a-b;
}
double multiply(double a, double b)
{
return a*b;
}
double divide(double a, double b)
{
return a/b;
}
How to Mount Android To Windows With Root File System Access

Some Basic Requirements
Here are some of the basic requirements your phone and computer should fulfill before you can run the application.
Phone Requirements
- The phone must be rooted and you must have the latest version of BusyBox installed on it.
- BusyBox Download:https://www.dropbox.com/s/97uwf11d2r2qbp7/busybox-1.21.1.tar.bz2
- You must enable USB debugging on your phone. ICS and above users can find the option in Settings—>Developers Option. For users who are still running on Android 2.2.x and 2.3.x can find the settings under Settings->Applications->Development
- You must have a data cable to connect your phone to your computer.
Computer Requirements
- You must have the latest ADB drivers installed on your computer.
- You will need admin acces to computer to install and run the program
Installing Android Commander
If you meet all the above requirements you can go ahead and install Android Commander on your computer. The application installs just like any other Windows application and you just need to follow the onscreen instructions to complete the setup.
After install the application, launch it. No need to mount your Android SD card as storage media, the app will read the data using the ADB interface. The app will look similar to an FTP application with the Windows files arranged on the left-pane and the Android file system mounted on the right-pane. The Android file system will be mounted as a root user and you could edit, update or delete any system file from Windows itself.


You can install applications using the APK files saved on your desktop. If your Android keys or screen is broken, you can use Android Commander to control your phone completely. Apart from some basic soft keys, you can transfer text to your phone on apps like WhatsApp. There are plenty of other useful features of the application you can explore.

Conclusion
Android Commander is undoubtedly a great find and if you love to play with your Android file system to install some new patches or hacks, Android Commander will prove to be very helpful. If you know of a better application that could help me with similar tasks, don’t forget to mention it in the comments.
12 Brilliant Command Prompt (CMD)

No matter how good Windows may evolve on the GUI front, Command Prompt was how it all began. So here are some great tips you can use to make yourself comfortable while working with the Command Prompt. like
1. Open Command Prompt in any Folder
2. Enable QuickEdit for Easy Copy/Paste
3.Make Undeletable, Unrenamable Folders
and 8 more amazing tricks using cmd..
1. Open Command Prompt in a Folder
When you open the command prompt, it opens up in either User or System folder depending upon whether you ran it as administrator or not. Now the thing is, if you want to execute a file in any particular folder, you would have to use the change directory(cd) command to navigate to the folder which can be a problem if the directory is nested way too deep.

To ease things you can open the folder in your windows explorer, hold Shift key when you right-click in the folder and select Run command window here to directly open the CMD prompt with the path to that folder directly.
2. Enable QuickEdit for Easy Copy/Paste
One thing I miss the most in Command Prompt is the ability to easily copy and paste text using the conventional Windows hotkeys. Normally, one would have to use the right-click context menu options to copy and paste text, but if you enable QuickEdit, you can do them using simple shortcuts.

To enable the QuickEdit mode, right-click on the Command Prompt Title Bar and select Properties. In the Properties Window under the Option Tab enable QuickEdit Mode. That’s all; you can now quickly select text by dragging your mouse pointer. Pressing the enter key on the selected text will copy the text to the clipboard and a simple left click would be enough to paste the text.
3. Run Command Prompt as Admin
Many commands require you to run command prompt as administrator. When you search for CMD in Start Menu, other than selecting Run as administrator from the right-click menu, you can simply press Ctrl+Shift+Enter to open it with admin privileges. This trick will work for all the programs installed on your system.
4. See Command History
You can see last used commands in a session using the navigation buttons, but if you would like to see a list of all the commands, you can get it by pressing the F7 button.

Alternatively, you can use the command doskey /history to list these commands in the command prompt itself.

5. Change Command Prompt Looks

There are multiple ways of bringing up the customization window and each one has its own significance.
On any open instance, click on the control icon (top left of the window) and choose Properties.The changes here apply only to the current window. If you choose Defaults the settings would be saved for future instances except the current one.

If you wish to apply changes to a particular shortcut, right-click and bring up its Properties.Hence, the settings would apply only to that particular shortcut. This also means that you can apply different settings to different shortcuts.

There are things like window size, buffer size, color and font that can be modified easily. Let us check them out and understand the behavior associated with each one of them.
Window Layout and Size
I consider this to be the most important because it is really difficult to work on the default window (with very little height and width). The section for Window Size lets you define your own lengths for the window. Hit and try different values to make it exactly fit your screen.

Screen Buffer Size defines the amount of scrolling area you wish to have. It works as a wonderful adjustment for people requiring long sessions. It lets them scroll through and check things
I suggest that you check off Let system position window. That is what works best unless you need something very specific.
General Options
From the Options tab you may choose the Cursor Size and toggle between two Display Options (while on window view your layout settings will prevail).

More important things here are Command History and Edit Options.
- Buffer Size represents the number of commands that that will be remembered and available with up/down arrows.
- Number of Buffers denote the maximum number of independent buffers that will be created and available for multiple instances at the same time.
- Check Discard Old Duplicates if you do not want the memory to be clogged with duplicate commands within the set buffer size.
- Quick Edit Mode is great to use when you perform a lot of copy and paste operation.With this set checked, you can simply highlight the text to copy and right-click to paste.
- Insert Mode lets you insert characters at the cursor location. Otherwise, the contrast is to strike off and overwrite the following characters.
- Auto Complete shows up only in Defaults mode. When it is on, you can hit tab to complete file/ directory names easily.
Font and Color Options
These may not seem very important. But at work you should configure them to comfort your eyes and choose colors and fonts that suit you best.
You may change the font size (depending on how far you are seated from the monitor) and font type (depending on what you like).

When it comes to colors you should be wise enough to choose background and font color in proper contrast.

Note: While you make the changes, its preview will be available on the Window Preview. It gives you an approximation of your changes
6. Copy Commands Output to Clipboard Directly
Sometimes one might want to copy the output from a command to clipboard, like at times when you get an error, and you want to paste the exact error in email or while chatting with someone.
To store a command output to a clipboard add the command | clip at the end of the command. For e.g. Dir /p | clip
7. Drag and Drop Files to Change Path
If you are already in command prompt, and you want to copy the exact path to a folder or file to run the file or change the present working directory, you can simply drag and drop the file or the folder on the command prompt.
The path of the dropped file or folder will show up in quotes.
8. Run Commands Simultaneously
You can put && between two commands and execute them one after another. The command on the left will execute first followed by the command on the right of the double ampersand.
9. Get Help for Command

Well let’s say you know about a command, but you are not sure how it works. Not a problem, all you need to do is suffix the command with /? and execute it. If the command is valid, the command prompt will give you all the information related to it.
10. Watch Star Wars in ASCII

For all my nerdy friends who are diehard fans of Star Wars, you can actually watch the Star Wars Episode IV movie in the command prompt. Though it would be in ASCII, it will be fun. To start the movie, open command prompt, type in telnet towel.blinkenlights.nl. and press enter.
11. Make Undeletable, Unrenamable Folders

Click on Start.
Click on Run. Type in "cmd" without quotes.
In the Command Prompt Window that opens, type the name of the drive you wish to create your folder in the format <drive-name>: and press Enter. e.g. If you wish to create the undeletable folder in D drive, type "D:" without the quotes. Note that the folder cannot be created in the root of C:/ drive (if C: is your system drive).
Type this command- "md con\" or "md lpt1\" without the quotes and press Enter. You can choose any of the keywords given above as the name of your folder.
Now Windows will create an undeletable, unrenamable folder in the drive you entered in Step 3. However the folder can be renamed to another keyword using Windows Explorer.
Deleting the Folder
Although it is not possible to manually delete the folder, you can delete the folder by typing "rd con\" or "rd lpt1\" in Step 4 instead of "md con\" or "md lpt1\".
Windows Compatibility: This works on Windows XP, Windows Vista, Windows 7 and Windows 8.
Try it yourself to create one such folder which can neither be deleted nor be renamed.
12.Know your IP address, DNS Server's address and a lot more about your Internet Connection

For Windows XP Users, there’s no need to select Run as Administrator, all you need to do is Click on Start and then Run and type cmd in the Open box and press enter.
For Windows Vista and Windows 7 Users, click on the Windows Start button and type cmd, right click cmd on the top and select Run Administrator.Command Prompt can even let you know your IP address. Just type ipconfig/ all in the command prompt and press Enter. Along with your IP address and DNS servers, command prompt will also return a ton of information like your host name, primary DNS suffix, node type, whether IP Routing ,Wins Proxy, and DHCP are enabled, your network adapter's description, your physical (MAC) address.
For Windows Vista and Windows 7 Users, click on the Windows Start button and type cmd, right click cmd on the top and select Run Administrator.Command Prompt can even let you know your IP address. Just type ipconfig/ all in the command prompt and press Enter. Along with your IP address and DNS servers, command prompt will also return a ton of information like your host name, primary DNS suffix, node type, whether IP Routing ,Wins Proxy, and DHCP are enabled, your network adapter's description, your physical (MAC) address.
How To Clean The Inside Of Your Computer
Heat is your computer's worst enemy. Over time, dust buildup inside your computer could undermine its cooling efficiency, resulting in shorter life spans for your computer's components. To help keep your computer running cool, clean the inside of your computer every 6 to 12 months. Here's how:
Step 1: Turn off your computer and unplug it from the electrical outlet or surge protector.
Step 2: Open up your computer's case.

Step 3: Using compressed air, dust the internal components of your computer with short bursts of air. Try to remain at least a few inches away from the surface of the motherboard, memory, processor, and expansion cards.
Step 4: Remove the dust buildup on your case fans with a can of compressed air. Hold the fan with your finger to keep it from spinning while you're blowing the compressed air onto it. Fan blades can be delicate and may crack if spun too quickly. You can use rubbing alcohol and wipe the blades with a cotton swab for the finishing touches. If the fans are hard to reach or extremely dirty, feel free to remove them from the case for easier cleaning.

Step 5: Remove the dust buildup from the power supply using a can of compressed air. If your case has a dust filter underneath the power supply, be sure to clean the filter too.

Step 6a: The heat sink and fan that's mounted on your processor should be cleaned as well. Again, with a can of compressed air and using short bursts, blow the dust away from the heat sink and fan. If the buildup is too heavy, you may need to remove the heat sink and fan from the processor to get it thoroughly cleaned. Just remember to clean the thermal grease off of the processor and the heat sink, then apply new thermal grease before reattaching the heat sink to the processor.


Step 6b: To remove the thermal grease, moisten a lint-free cloth with 99 percent isopropyl alcohol, then wipe away the thermal grease from the processor and the heat sink. Less concentrated alcohol will also work but may leave a residue that could reduce the efficiency of the thermal paste or grease. A commercially available thermal material remover, called ArctiClean, can be used instead of the isopropyl alcohol, and coffee filters can be used instead of a lint-free cloth.
Step 7: Finally, dust off all the ports on the computer with compressed air and clean all the exterior vents with rubbing alcohol and a cotton swab.
How to Block Websites
Want to block all users of a Windows PC from opening certain websites, regardless of the browser they use or the time of day? You need only make a few simple additions to the Windows hosts file. This method is straightforward and free, and it doesn’t require you to download or install any additional software. It's an effective method for restricting users of all ages from seeing the content you don’t want them to access.
Block a Website on Your PC
1. Open Windows Explorer and navigate to C:\Windows\System32\drivers\etc. If Windows is not installed on C:, substitute the appropriate drive letter.
2. Double-click hosts, and select Notepad when Windows prompts you to choose a program. If you don't get the prompt, or if the hosts file opens in another program, open Notepad (Start, All Programs, Accessories, Notepad), and then navigate to hosts by clicking File, Open within Notepad.

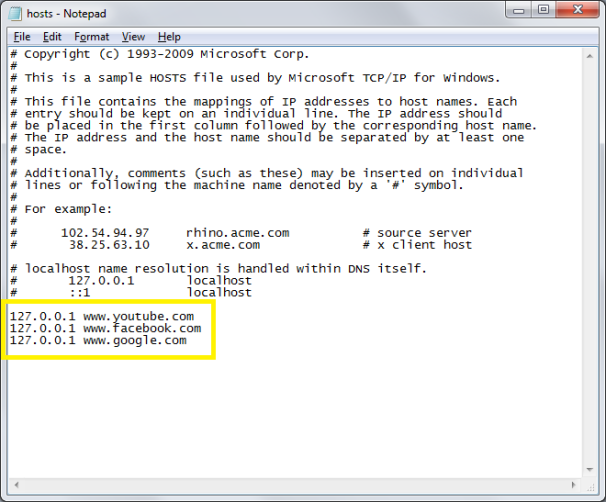
3. Place the cursor at the end of the last line, which will say something such as '127.0.0.1 localhost' or '::1 localhost'. Press Enter to create a new line.
4. Type 127.0.0.1, tap the spacebar once, and then type the address of a website you want to block. For example, to block all traffic from YouTube, type 127.0.0.1 www.youtube.com on this line.
5. Continue to add the websites you wish to block, each prefaced with 127.0.0.1 and a space.
6. Click File, Save to commit to your changes. Dismiss any warnings from antimalware software, which may be triggered by your editing of the hosts file.
7. Close any open browser windows, and then reopen a browser to test your edits. The blocked sites should not display in any browser.
Selectively Block a Website Based on User or Time of Day
If blocking a site from all users at all times is overkill for your situation and you want more control, try using your router’s Web interface to block a website selectively.
1. Open a browser and enter your router’s IP address into the address bar. Refer to your router’s documentation for the IP address, or, if you don’t immediately know it, try a common address such as http://192.168.1.1, http://192.168.0.1, or http://192.168.2.1.
2. Enter your username and password. If you haven’t changed the username and password.
3. Browse to the section where you can block websites, computers, and access during certain times of day. Router interfaces vary, but look for a section with a name such as 'Access Restrictions'.
4. Enter the details of the content and the users you’d like to restrict, and save your changes. Your router’s paper or electronic documentation should provide full instructions.
Remember to exercise caution when editing your hosts text file, and always make sure to back up files before you edit them.
How to Access Blocked Websites, And View Restricted Sites
Most of us find ourselves in situations where a website we wish to visit is blocked by a software or by our ISP (Internet Service Provider). So the question arises, how can we access blocked websites? The answer to this is simple: Proxy websites. Before going into details, let us know a bit about these proxy websites.
If you do not want to search, here are few popular free proxy websites you can use:-

Proxy Websites
A proxy website acts as an intermediate source between the user and server the site being contacted is hosted on. Users send requests to proxy websites which conveys them to the site's server. The reply received by the proxy website is then forwarded to the user's computer. This gives an impression to ISP's and blocking software that the user is visiting the proxy website but in reality, s/he is visiting the site which was blocked. Thus, proxy servers also provide extra security to users by hiding their online activities from their ISP's.Commonly Blocked Web Sites
The sites which are most commonly blocked at workplaces, schools and offices include websites like Facebook, Orkut, Blogger (blogspot), Google News, Typepad, eBay, MySpace, YouTube, MSN, Yahoo! Messenger, Bebo, Google Talk, Gmail, Photobucket, AOL AIM, Flickr, Twitter etc. In some countries, social bookmarking sites like Digg and Reddit are also blocked. Countries like Saudi Arabia, Pakistan, China have even blocked access to mainstream media websites like The New York times. A proxy website can be used to easily access these blocked websites. As proxy websites hide a user's location, they can also be used to access popular websites which are restricted to particular countries and block users from other countries from visiting them.Types of Proxies
There are two types of proxies. First, there are web proxies which have an interactive interface; and second, the proxy servers which work on the basis of IP Addresses and port numbers. Proxies can also be segregated on the basis of anonymity into Anonymous, Transparent and High Anonymous depending upon the amount of privacy they provide.How to Find Proxy Websites and Proxy Servers
A simple Google search containing the word "proxy websites" is likely to return a lot of useful results. However, most of them are likely to be lists containing proxy servers which you can setup using their IP Address and Port Number. So, in order to find interactive proxy websites, you will have to search for something like "Facebook Proxy Server" or "Orkut Proxy Server". A search like this is most likely to return interactive proxy websites with which you can access your blocked website by simply entering the URL in URL field. If you want additional security and anonymity, you can opt for a paid proxy server.If you do not want to search, here are few popular free proxy websites you can use:-
- http://www.hidemyass.com
- http://www.spysurfing.com/
- http://proxify.us/p/
How to Setup Proxy Servers using their IP Address
If you wish to visit your blocked website using a web proxy, you do not need any setup. However, if you wish to use a proxy server that can only be accessed by using its IP address and port number, you must configure your browser to use it. Follow the instructions given below to setup this type of proxy in your browser:-Google Chrome and Internet Explorer Users
Google Chrome uses the same network settings as Internet Explorer. So, in order to configure Google Chrome to use a proxy server, you have to configure Internet Explorer. You can configure a proxy server in Internet Explorer by following the instructions given below:-- Start Internet Explorer.
- Click on Tools, Internet Options.
- Click on Connections Tab, select your Network Connection and click on Settings.
- Check on Use a Proxy Server for this Connection.
- In the Address field, add the IP Address of your Proxy server. In the Port field, enter the Port Number.
- Click on OK and OK again.
Mozilla Firefox Users
Mozilla Firefox users can configure their browser to use a proxy by following the instructions given below:-- Start Mozilla Firefox.
- Click on Tools, Options.
- Click on Advanced Tab.
- Click on Network tab.
- Click on Settings.
- Encircle Manual Proxy Configuration.
- Enter the IP Address and Port Number at the appropriate place. In most cases, it will be a HTTP server.
Shutdown Your Computer Or A Remote PC Via Command Prompt
1) Press Windows Key + R.
2) Enter CMD and press Enter.
This will start the command prompt. Follow the instructions below depending on what you want to do.

Shutdown Local Machine (Your Computer)
Type "shutdown -s" without the quotes in the command prompt and press Enter. Shutdown is the command being executed and the switch -s tells the computer to shutdown.
Restart your Local Computer
Type "shutdown -r" in the command prompt and press Enter. In this case, the command switch -r is telling the computer to restart after shutdown.
Log Off the Current User
Type "shutdown -l" in the command prompt and press Enter. The -l command switch tells the computer to log off.
Shutdown a Remote Computer
Type "shutdown -s -m \\name of the computer" in the command prompt and press Enter. Replace \\name of the computer with the actual name of the remote computer you are trying to shutdown. As mentioned earlier, you must have administrative access to the computer you are trying to shutdown. To know if you have administrative access, press Windows key + R and then type the name of the computer and press Enter.
Note: If you don't remember the name of the remote computer, you can look for it by opening a list of all the computers you are connected to by executing "net view" in command prompt.
If you can connect to the computer, you will be asked to login with your username and password. Upon entering them, a window will display the list of all the directories available to you. This should help you know whether you can or cannot shutdown the remote computer.
Hibernate a Local Computer
Type in "Rundll32.exe Powrprof.dll,SetSuspendState" without the quotes and press Enter. Your computer should hibernate, if it does not, then you must enable hibernation to do this.
Shutdown your or a remote computer after a specific time
Type "shutdown -s -t 60" to shutdown your computer after 60 seconds. Upon executing this, a countdown timer displaying a warning message will be shown. This command uses the -t command switch followed by a variable (which is 60 in this case) which represents the number of seconds after which the computer will shutdown.
Display a Message containing the reason for shutdown
Type shutdown -s -t 500 -c "I am tired. I don't want to work anymore." (with the quotes) in the Command Prompt and press Enter. The -c switch is used in the code to give the reason for shutting down and what is followed in quotes will be displayed in the dialog box as the reason. This can be used to display all sorts of funny messages. One example :-
Skynet has become self aware. John Connor did not stop me. You can not use your PC anymore.
Stop a System Shutdown
Type "shutdown -a" and press Enter. This will stop the system from shutting down if the countdown to shut down has not reached 0.
2) Enter CMD and press Enter.
This will start the command prompt. Follow the instructions below depending on what you want to do.
Shutdown Local Machine (Your Computer)
Type "shutdown -s" without the quotes in the command prompt and press Enter. Shutdown is the command being executed and the switch -s tells the computer to shutdown.
Restart your Local Computer
Type "shutdown -r" in the command prompt and press Enter. In this case, the command switch -r is telling the computer to restart after shutdown.
Log Off the Current User
Type "shutdown -l" in the command prompt and press Enter. The -l command switch tells the computer to log off.
Shutdown a Remote Computer
Type "shutdown -s -m \\name of the computer" in the command prompt and press Enter. Replace \\name of the computer with the actual name of the remote computer you are trying to shutdown. As mentioned earlier, you must have administrative access to the computer you are trying to shutdown. To know if you have administrative access, press Windows key + R and then type the name of the computer and press Enter.
Note: If you don't remember the name of the remote computer, you can look for it by opening a list of all the computers you are connected to by executing "net view" in command prompt.
If you can connect to the computer, you will be asked to login with your username and password. Upon entering them, a window will display the list of all the directories available to you. This should help you know whether you can or cannot shutdown the remote computer.
Hibernate a Local Computer
Type in "Rundll32.exe Powrprof.dll,SetSuspendState" without the quotes and press Enter. Your computer should hibernate, if it does not, then you must enable hibernation to do this.
Shutdown your or a remote computer after a specific time
Type "shutdown -s -t 60" to shutdown your computer after 60 seconds. Upon executing this, a countdown timer displaying a warning message will be shown. This command uses the -t command switch followed by a variable (which is 60 in this case) which represents the number of seconds after which the computer will shutdown.
Display a Message containing the reason for shutdown
Type shutdown -s -t 500 -c "I am tired. I don't want to work anymore." (with the quotes) in the Command Prompt and press Enter. The -c switch is used in the code to give the reason for shutting down and what is followed in quotes will be displayed in the dialog box as the reason. This can be used to display all sorts of funny messages. One example :-
Skynet has become self aware. John Connor did not stop me. You can not use your PC anymore.
Stop a System Shutdown
Type "shutdown -a" and press Enter. This will stop the system from shutting down if the countdown to shut down has not reached 0.
Enable Registry Editor Disabled By Administrator Or Virus
Registry Editor is a useful utility in Windows which allows users to easily change advanced Windows settings by altering registry keys present in a hierarchical arrangement called the Windows Registry. Despite being such a powerful tool, Registry Editor is not totally error-proof.
A simple virus infection is all it takes to render it useless. Or, there are times when your administrator has actually disabled Registry Editing. When you try to open the Registry Editor in one such computer, you are likely to receive the“Registry editing has been disabled by your administrator” error. Due to this error, it is impossible to remove this restriction using Registry Editor itself.
This article suggests some workarounds for re-enabling Registry editing in a computer running Windows XP, Windows Vista, Windows Server 2003/ 2008, Windows 7 or Windows 8.
Just save UnHookExec.inf and install it by right clicking and selecting install. Installing the file will not show any popup or notice box.
If the above link does not work, copy the code given below in Notepad and save the file as *.vbs or Registry Editor.vbs.
A simple virus infection is all it takes to render it useless. Or, there are times when your administrator has actually disabled Registry Editing. When you try to open the Registry Editor in one such computer, you are likely to receive the“Registry editing has been disabled by your administrator” error. Due to this error, it is impossible to remove this restriction using Registry Editor itself.
 |
| Windows Registry Editor |
This article suggests some workarounds for re-enabling Registry editing in a computer running Windows XP, Windows Vista, Windows Server 2003/ 2008, Windows 7 or Windows 8.
Enable Registry Editor Using Group Policy Editor
- Click on Start. Go to Run. Users running Windows 8, Windows 7 or Vista, go to Search.
- Type gpedit.msc and press Enter.
- Navigate to User Configuration/ Administrative Templates / System.
- In the work area, double click on "Prevent Access to registry editing tools".
- In the popup window, encircle Disabled and click on OK.
- Normally, Registry Editor will be immediately accessible. If it is not, restart your PC.
 |
| Getting access to Registry Editing |
Enabling Registry Editor using UnHookExec.inf from Symantec
Symantec has created a small .inf file which can be installed to remove restrictions on modifying registry keys at the click of a mouse. Most viruses, spywares, Trojans or worms normally affect the shell\open\command keys which allows them to run each time when a file of specific type is executed. Normally, they associate their execution with .exe files. UnHookExec.inf not only enables registry editing but also removes such associations.Just save UnHookExec.inf and install it by right clicking and selecting install. Installing the file will not show any popup or notice box.
Enable Regedit by simply running a CMD Command
- Open Notepad.
- Copy the code given below and paste it.
- Save the file as EnableRegistry.bat. Run this file as Administrator if you use Windows 8, Windows 7 or Windows Vista. In Windows XP, simply open the file. CMD will flash for a second and then disappear. This indicates successful execution.
- Log Off and Log Back On.
Visual Basic Script to Enable/ Disable Registry Editor
Doug Knox has created a VBS Script which allows users to easily enable and disable Registry Editor. Just download regedit tools.vbs and double click on it. This script reverses the current state of Registry Editor. If registry editing is set to enabled, this script will disable it and if it is disabled, it will enable it.If the above link does not work, copy the code given below in Notepad and save the file as *.vbs or Registry Editor.vbs.
After running the VBS file, if Registry Editing is not enabled, try restarting your PC.


_edited.jpg)


.JPG)
_edited.jpg)
