You can do this with most goodphoto editors, although the exact look will depend on the filters and effects available, and your own choices. The instructions below are for two consumer-oriented editors--Photoshop Elements(PE), which is my personal favorite, andPhoto Pos Pro(Pos), which is free.
But be careful if you install either of these. If you don't pay attention, both may try to install additional programs you may not want.
To get started, load your original photo into your editor, crop it as you see fit, and save the imageto the editor's default format. For PE, save it as a .psd file. For Pos, .fpos.
You use filters or effects to give the photo that artificial look. In Photoshop, selectFilter>Artisticand pick any option. The resulting dialog box helps you choose. I went with Film Grain.
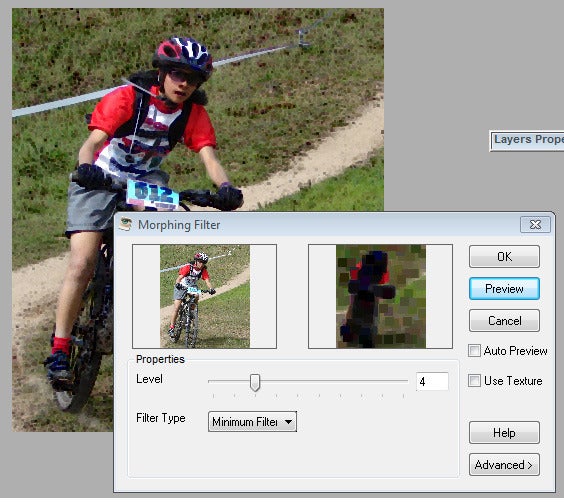
Pos doesn't offer quite as many options. But try Filters>Morphing Filters. For the Filter Type, select Minimum Filter, then click the Preview button to change the actual image. Adjust the options until you're satisfied, repeatedly clicking Preview as needed.
Another option would be to leave thisfilteringfor later, so you can use different filters on different layers.
And speaking of layers, you must now create two of them:
In Photoshop Elements, selectLayer>Duplicate Layer;name the layerb&w. Then repeat the process, this time naming the new layerforeground. If you don't see the layers in a panel on the right, click theLayersicon in the lower-right corner.
In Pos Pro, selectLayers & Objects>Clone Layer.Right-click the new layer in the Layers Property box and selectLayer Info. Name the layerb&w. Repeat for a second duplicate, naming this oneforeground.
Next, convert the middle layer to black and white. Click that layer in the box or panel. Then, in PE, selectEnhance>Convert to Black and White. In Pos, select Colors>GrayScale (Black & White Photograph).
Don't be upset if the picture is still in color. Remember that you only changed the middle layer, but all you can see is the foreground layer.
Let's change that.
Now you have to select and delete the foreground layer's background. This is by far the hardest part of the job.
This is also where Photoshop Elements proves its worth. I've yet to find a free editor with selection tools anywhere near as good as PE's.
Both editors provide multiple selection tools, and I suggest you take the time to learn them and decide what you like. For PE 12 (the current version), I recommend the Quick Selection tool. For older versions, the Magic Extractor. For Pos, the Custom Selection tool.
I also suggest you first select the foreground--what you want to keep. Then invert the selection (you'll find that on the Select or Selection menu) and pressDelete.
Now you should have a color foreground and a black and white background, all looking a bit like an illustration. Examine your work for mistakes. If you see color where there should be black and white, click theforegroundlayer and carefully delete the offending bit. If you see black and white where you should see color, click theb&wlayer and carefully delete from there. Then you'll see why we kept an extra layer below.
Finally, save the image as a .jpg so anyone can view it.
To start, you need a few tools and a bit of know-how. Generally you need a screwdriver (or two) to help with the disassembly, pluscleaning materialssuch as canned air, alcohol, and cotton swabs. You want a small brush to wipe away dust and oldthermal interface material, and some replacement thermal paste.
My GPU-refurbishing project began with a dusty, dirty old Radeon HD 5870 that has been beaten up and neglected for the past couple of years.
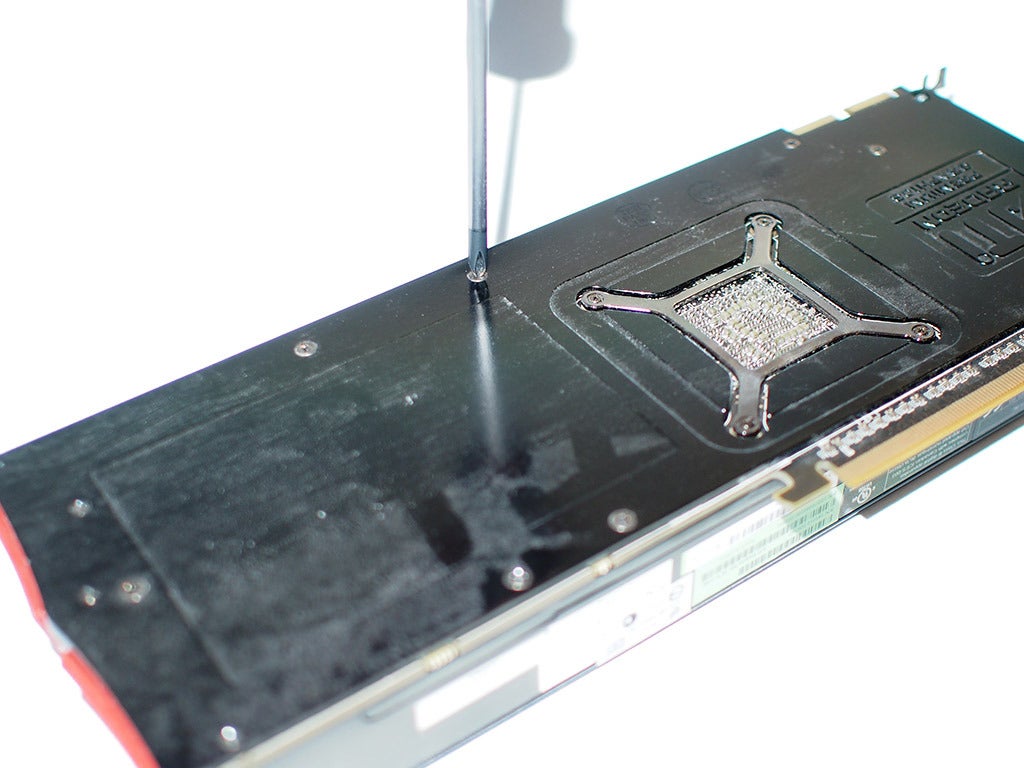
I’m using a Radeon HD 5870 graphics card for this project, a decent GPU that’s a few years old at this point. (Although your card may be different, the instructions that follow should work with appropriate adjustments.) This ATI card uses three different sizes of Phillips-head screws to secure its case bracket, heat sink, and fan shroud, and it features an additional heat/reinforcement plate on the back.
Its barrel-shaped fan and relatively long heat sink—with densely packed fins—are prone to dust buildup. Plus, since this was a powerful GPU in its time, it can getreally hot when playing games.
When it was brand-new, this card’s GPU temperature usually hit around 172degreesFahrenheit (78 degrees Celsius) under load. But since it has gotten so dusty and dirty, it’s reaching temps closer to 185 degrees Fahrenheit (85 degrees Celsius) now. The card’s fan is not only louder, but it also spins up more quickly and more frequently—working overtime to manage the heat.
The disassembly
To clean and refurbish the card, you first need to disassemble it. Begin by removing the screws holding the card’s rear heat/reinforcement plate in place. Next, remove the two smaller screws that secure the case bracket to the fan shroud. Finally, remove four even smaller screws that hold a spring-loaded heat sink mount.
Typically you need to remove several screws to detach a graphics card’s fan shroud and heat sink. My Radeon HD 5870 also had a backplate reinforcement that had to go.
With all of the screws removed, you’d think the card would just fall apart, but that doesn’t always happen. Most graphics cards are covered with sticky thermal pads and other thermalinterfacematerials that can act as adhesives. My Radeon HD 5870, for example, had thermal pads between the reinforcement plate and the rear-mounted RAM chips, between the main heat sink and the front-mounted RAM chips, and between the heat sink and the GPU.
Be especially careful when pulling the card apart so as to not damage any surface-mounted components or the thermal pads themselves. I gently pried the reinforcement plate off the card, using steady, even pressure. I then did the same for the fan shroud and the heat sink. After pulling off the shroud, I also had to unplug the cooling fan from a port on the PCB.
When disassembling a graphics card, be careful to track every screw, and be vigilant for small parts such as springs that may want to come shooting out.
After I pulled the card apart, it was immediately obvious why the card was getting so hot: Its heat sink and fan were filthy. There was way too much thermal paste installed on the GPU, as well, and to make matters worse, the thermal paste had begun to dry and crack.
I used canned air and a small brush to remove the gunk from the cooling-fan heat sink. With cotton swabs and a small amount of alcohol, I cleaned the older thermal paste from the GPU and the base of the heat sink.
We can rebuild him
After cleaning the graphics card’s heat sink and fan, and removing its subpar thermal paste, I reapplied fresh thermal paste and put the card back together. I also took a couple of additional steps to make sure that the card’s cooler would perform at its peak.
Not only was there too much thermal interface material used on my GPU, but it had begun to dry out and crack, which hinders cooling performance.
On the Radeon HD 5870, a metal clip with four springs serves to attach the heat sink to the GPU and apply enough downward pressure to ensure good contact and thermal transfer. Over time, that clip and the four springs can become deformed or compressed, which ultimately lowers the contact pressure. To remedy that, I carefully flexed the bracket upward and slightly stretched the springs back out. With the bracket and springs stretched out, they would apply the pressure necessary to hold the heat sink tightly against the GPU.
To ensure optimal cooling performance, I had to clean this GPU’s heat sink and completely remove the sloppy, old thermal paste.
When you’re applying new thermal paste, the goal is to use the least amount of paste necessary to produce an ultrathin layer over the surface of the chip you’d like to cool. I doled out a drop of thermal paste the size of a BB, and spread it outward until the surface of the GPU was covered. I then reassembled the card, confirming that the heat sink was installed properly and making good contact with the GPU.
Don’t forget a fresh coat of software
Now that you’ve cleaned and reassembled the graphics card, it’s ready to go back into your machine. But don’t forget the software! Download new drivers while you’re thinking about it.
Though flashing a newer vBIOS on an older card is not usually necessary, doing so can help to increase its performance, as was the case when AMD introduced Boost on the Radeon HD 7950. A new vBIOS can also enhance your card’s stability or fix compatibility issues, as was the case with a recent vBIOS update for GeForce GTX Titan cards that enhanced their compatibility with tiled 4K displays.
If you’re an experienced NVFlash user—that is, you truly know what you’re doing—you can use that free utility to flash unofficial vBIOS software to your Nvidia GPU.
To flash your graphics card’s vBIOS, check the card manufacturer’s website to see if an update is available. If so, simply download it and follow the instructions that the manufacturer provides. The more daring can use tools such as NVFlash or ATI Flash to experiment with alternative vBIOS files. Tread lightly, though.
The end result
All of this effort paid off for my aging GPU. Now it rarely hits 167 degrees Fahrenheit (75 degrees Celsius) under load, and the fan doesn’t produce nearly as much noise. My PC runs more quietly, and I know that my GPU probably just got another year or two of life out of the deal.
STEP-1: Create a new folder (Right-click -> New -> Folder) and give it any name of your choice. For instance you name it as PC.
STEP-2: Now place all the important files, documents or any other folder in this folder that you want to password protect. STEP-3: Now Right-click on this folder (PC) and select the option Send To -> Compressed (zipped) Folder. STEP-4: Now a new compressed zipped folder gets created next to folder (PC) with the same name. STEP-5: Double-click on this compressed zipped folder and you should see your original folder (PC) there. STEP-6: Now go to the File menu and select the option Add a password. Example: File -> Add a password You will get small pop up window here. You can set your desired password. Once the password is set, It will ask for the password every time it is opened. Thus you have now created the password protected folder.
How To Make It Invisible
STEP-1: Right-click on this password protected folder and click on Properties.
STEP-2: At the bottom select the option Hidden and press OK. Now your folder gets invisible. STEP-3: In order to unhide this folder go to My Computer – >Tools -> Folder options. Switch to View tab, scroll down and under Hidden files and folders you’ll see the following two options
Do not show hidden files and folders Show hidden files and folders Here you select the second option and press OK. Now the invisible folder becomes visible in it’s location. To access it you need the password. To make it invisible again repeat STEP-1 through STEP-3 and select the first option and click OK. Now the folder becomes invisible once again.
1. Complete Information About your Phone *#*#4636#*#*
This code can be used to get some interesting information about your phone and battery.
Usage statistics
2. Factory data reset *#*#7780#*#*
This code can be used for a factory data reset. It'll remove following things:
Google account settings stored in your phone
System and application data and settings
Downloaded applications
It'll NOT remove:
Current system software and bundled application
SD card files e.g. photos, music files, etc.
Note: Once you give this code, you get a prompt screen asking you to click on "Reset phone" button. So you get a chance to cancel your operation.
3. Format Android Phone *2767*3855#
Think before you give this code. This code is used for factory format. It'll remove all files and settings including the internal memory storage. It'll also reinstall the phone firmware.
Note: Once you give this code, there is no way to cancel the operation unless you remove the battery from the phone. So think twice before giving this code.
4. Phone Camera Update *#*#34971539#*#*
This code is used to get information about phone camera. It shows following 4 menus:
Update camera firmware in image (Don't try this option)
Update camera firmware in SD card
Get camera firmware version
Get firmware update count
WARNING: Never use the first option otherwise your phone camera will stop working and you'll need to take your phone to service center to reinstall camera firmware.
5. End Call/Power
*#*#7594#*#*
This one is my favorite one. This code can be used to change the "End Call / Power" button action in your phone. Be default, if you long press the button, it shows a screen asking you to select any option from Silent mode, AirPlane mode and Power off.
You can change this action using this code. You can enable direct power off on this button so you don't need to waste your time in selecting the option.
6. File Copy for Creating Backup *#*#273283*255*663282*#*#*
This code opens a File copy screen where you can backup your media files e.g. Images, Sound, Video and Voice memo.
7. Service Mode
*#*#197328640#*#*
This code can be used to enter into Service mode. You can run various tests and change settings in the service mode.
8. WLAN, GPS and Bluetooth Test Codes: *#*#232339#*#* OR *#*#526#*#* OR *#*#528#*#* - WLAN test (Use "Menu" button to start various tests) *#*#232338#*#* - Shows WiFi MAC address *#*#1472365#*#* - GPS test *#*#1575#*#* - Another GPS test *#*#232331#*#* - Bluetooth test *#*#232337#*# - Shows Bluetooth device address
9. Codes to get Firmware version information:
*#*#4986*2650468#*#* - PDA, Phone, H/W, RFCallDate *#*#1234#*#* - PDA and Phone *#*#1111#*#* - FTA SW Version *#*#2222#*#* - FTA HW Version *#*#44336#*#* - PDA, Phone, CSC, Build Time, Changelist number
10. Codes to launch various Factory Tests:
*#*#0283#*#* - Packet Loopback *#*#0*#*#* - LCD test *#*#0673#*#* OR *#*#0289#*#* - Melody test *#*#0842#*#* - Device test (Vibration test and BackLight test) *#*#2663#*#* - Touch screen version *#*#2664#*#* - Touch screen test *#*#0588#*#* - Proximity sensor test *#*#3264#*#* - RAM version
1)Backup your data.When you format a computer, you will lose all of your files and data. The programs can’t be backed up; they will need to be reinstalled. Any files—including documents, music, pictures, and videos—that you want to save need to be copied to a backup location.
You can use DVDs, CDs,external hard drives, flash drives, or the cloud, depending on how much data you have to backup.
2)Set your BIOS to boot from CD.To do this, restart the computer and enter the setup screen when the manufacturer logo appears. The key to do this will be displayed, and varies by manufacturer. The most common keys are F2, F10, F12, and Del.
Once in the BIOS menu, select the Boot menu. Change the order of devices so that your computer boots from CD before booting from the hard drive. Save your changes and exit. Your computer will restart.
If you are installing from a flash drive, then you will need to set the BIOS to boot fromremovable storage
3)Begin Setup.If the CD has been inserted and the BIOS is set correctly, you will see a message telling you to “Press any key to boot from CD…” Press a key on the keyboard and the setup process for Windows 7 will launch.
Your system may automatically launch the setup program without asking you to press any key.
4)Watch the Windows files load.After completion, the Windows 7 logo will appear. No files have been altered on your computer yet. Your data will be deleted in later steps.
5)Choose your preferences.
You will be prompted to confirm your Language, Time & Currency format, and Keyboard or input method. Select the appropriate options for you .
6)Click Install Now.Do not clickRepair Computer, even if you are repairing a computer byreinstalling Windows. Once clicked, Setup will begin loading the files it needs to continue,
7)Read and accept the terms.
In order to advance, you must indicate that you have read and agree to Microsoft’s terms of use. Be sure to read through it so that you know your rights and limitations as a user.
8)Choose Custom install.
This will allow you to perform a clean installation. Formatting the computer means wiping it of all the data that is on it, so you will be performing a clean installation so that you will be given the option to erase the disk.
9)Delete the partition.A window will open asking where you would like toinstall Windows. In order to perform a clean install, you need to delete the old partition and start with a clean slate. Click “Drive options (advanced).” This will give you the ability to delete and create partitions.
Select the partition of your existingoperating systemand click the Delete button.
10)If your hard drive has multiple partitions, be sure to delete the correct one. Any data on a deleted partition is lost for good.
11)Confirm the deletion process.
12)Select the Unallocated Space and click Next.
There is no need to create a partition before you install Windows 7, this is done automatically.
13)Wait while Windows installs files.The percentage next to ExpandingWindows fileswill steadily increase. This part of the process can take up to 30 minutes.
Windows will automatically restart your computer when finished.
14)Setup will launch again, and a message will tell you that Setup is updating registry settings.
15)Setup will then configure your computer’s services. This happens every time you start Windows, but will happen in the background next time.
16)A window will open letting you know that Windows is completing the installation. Your computer will restart again when this is complete.
17)Setup will now load drivers and check video settings. This part does not require any input from you.
18)Enter your user name and computer name.Your username will be used to log in to the computer and personalize your account. Your computer name is the name that your computer will display on the network.
You can add more users later through the Windows 7 control panel.
Windows will ask you for a password. This is optional but highly recommended, especially if the computer will be accessible by users other than yourself. If you’d rather not have a password, leave the fields blank and click Next.
19)Enter your product key.
This is the 25-character key that came with your copy of Windows. Check the “Automatically activate Windows when I’m online” to have Windows automatically verify your key the next time it is connected to the internet.
20)Select your Windows Update option.
To make sure that your copy of Windows runs securely and stably, it is highly recommended that you choose one of the first two options. The first option will install all updates automatically, the second option will prompt you when important updates are available.
21)Select your date and time.
These should be correct already as they are linked to your BIOS, but you can change them now if they are not. Check the box if your area observes Daylight Savings.
22)Select network preferences.If your computer is connected to a network, you will be given an option to identify that network. Most users will select Home or Work network. If your computer is being used in a public place, select Public network. Mobile broadband users should always select Public network.
Windows will now attempt to connect your computer to the network. This process is completely automated.
Explore your desktop.After one final loading screen, your new Windows 7 desktop will appear. Installation is now complete


_edited.jpg)


.JPG)
_edited.jpg)

